Feeds:
Posts
Comments

Posts Tagged ‘sustainability’

View the original post at A Life Enchanted

It’s been raining for days here in the Shire. But you won’t hear me complain. I love the rain. I find just as much beauty in a warm Spring rain as I do those bright sunny days. And I’m not afraid to get a little…or a lot wet for a visit to the garden.

I’m also not going to complain, because as you may have noticed, I have been rather preoccupied as of late. I know, I know. I haven’t written in days. I have been so busy with products though that there hasn’t been time for much of anything. I can’t tell you all the details for I don’t want to ruin any surprises for some, but I have been in a creating frenzy. My house has been littered with bottles and jars, paper drying and masses of heavenly herbs.  There have been early mornings, long days and late nights. I am proud to say I have created more potions and brews in the past week than ever before!

And my gardens can prove it. Oh, the neglect! I dodged a few rain drops and took some photos. You will see just what has been … NOT happening or happening without me here in the Enchanted Gardens. They sure aren’t looking very enchanted today. Have a look….

There’s quite a bit of lettuce.
But so much more waiting for a home.

Some celery, scallion and a lonely leek patiently waiting for the others to join.

The watermelon radish are putting up a good fight against the stones.

How do they get there?

The peas are looking okay.
I do wish I had gotten them in a week or two earlier.

 The blackberries need a straw blanket…
and perhaps a trim.

They chose this spot themselves. We didn’t plant them.
I do wish they had chosen a spot further from the raised beds.
Another bed and a fence belong here.
But I just don’t have the heart to pull them out.

 Nor do I have the heart to remove these
that have created a home on the other side of the raised beds.

Look at that mess!

 TOO many beets?

They self seeded AND I unknowingly planted more.
Thinning is in order here.

And here.
The cilantro self seeded last year
here where the pattypan squash will call home this year.

 And the dill called this place home
but the cucumbers are moving in soon.

Look at all that baby dill!
And I planted more…. uh oh.

 I was sad to tear out this raised bed,
but the hot tub needs a home too.

I told you it was a busy week…

The herb garden needs some love!
And some mulch.

But the chives are happy.

 The oregano is happy too.
She just needs a little hair cut.

So do her sisters.

The strawberry patch is doing okay,
but look what happens to the seaweed with all this rain.

Soft and mushy and slimy.
This is why I don’t use it for full mulching.

This is Matilda.
She was supposed to be a dwarf weeping cherry.

 She is not a dwarf.
I love her dearly, even if she is far too close to the house for her size.

The lawn is in terrible shape this year.
Ants and moles have taken up residence.
Sixx, the stealthy hunter is taking care of the moles.
The ants… well, that’s my job.
And I’m slacking.

The dogs have done their fair share of destruction as well.
I have my work cut out for me.

Nothing has been edged
and the mustard greens are trying to over take the lawn.

But The Mister’s grandmothers peonies are loving their new home.
Their very healthy, vibrant sisters didn’t fair so well.

Who new the gas man would decide the tank should be moved
when only come to fill??

And who in their right mind would place it over a group
of glorious peonies 3 feet wide?

Well, he did. And he killed them.
All of them.
This group here is the last of them because, well…
The Mister’s mum and aunts…
They killed theirs too.

I’m taking dear care of these ones.

Grow little beauties. Grow!
So the legacy may live on.

This is where my iPhone risked serious destruction as the drops turned to streams. The sun is finally shining though, and the last of the mass of botanicals is to be delivered today. Until Monday of course, when the conjuring will begin again.

I hope you get to play in your gardens this weekend!

Live Well!
~S 

We’re Moving!
Come visit our new home….

Read Full Post »

Did you like Regrow Celery?

Well, you are going to love this!

You can also regrow leeks and scallions or green onions. Really.

Look at these guys.

This is day seven… maybe eight… in water. It’s been cold and windy and well, rather busy here in The Shire. I haven’t had any time to plant these guys. But look how much they’ve grown.

Look at those roots.

I also planted a few more lettuce plants. I eat a lot of lettuce. So far I have planted 4 romaine and 2 green leaf lettuce in the gardens this year. At the market today I bought red leaf. I bought more scallions and leeks too.

Start regrowing today! 

Live Well!
~S 

We’re Moving!
Come visit our new home….

Read Full Post »

You heard me! REGROW celery.

This is the best.  Don’t throw out the end of that celery. Grow a new one!!!

Just cut the end off – about 3-4 inches.

Place them in a bowl of water.
Yes! That is lettuce you see there. It works for lettuce too!

This is day 5. Look how much the lettuce has grown.
You only need 3-4 days but they will stay longer if you don’t have time to plant.
I also am trying this with leeks and scallions for the first time.
We’ll see how it goes.
In this photo they have been in water a day.

Then plant!
Don’t worry about the yucky looking edges. They will decompose.

Regrow your celery and lettuce!

Live Well!
~S

This post shared at

Read Full Post »

In the world of sustainability we use what we have available to us. And lucky for me, not only do I live in an area where seaweed is readily available, but seaweed is also an amazing addition to any garden.

The Benefits of Seaweed –

  • Enriches the soil – Seaweed is full of beneficial trace minerals and hormones that stimulate plant growth. It’s a natural fertilizer.
  • Natural pest repellent – Slugs hate salt. They also hate sharp edged material because it cuts their soft bodies. Seaweed, being from the salty sea, contains a high salt content. When it dries, the edges get very sharp. It’s perfect for the strawberry patch! It also helps to repel other pests as well.
  • Acts as mulch –  A thick layer of seaweed can help keep soil moist by reducing evaporation and block the formation of weeds. It also does NOT contain weed seeds like many other mulch sources such as bark mulch.
  • Aerates and loosens the soil – When seaweed breaks down it helps to lighten soil, providing a better growing environment for plants.

Using Seaweed in Your Garden – 

  • When using as mulch be sure to apply it 5-6 inches deep. As it dries out, it will shrink, leaving gaps in coverage.
  • Because it dries and shrinks as it does, and breaks down well, it often needs to be reapplied one more time before the season is over.
  • Seaweed doesn’t have to be used as mulch. It can be added to compost or applied under your favorite mulch choice. You will still reap the benefits of fertilizing.
  • Don’t use kelp for mulch, except for between rows. They are hard to form around plants and leave things looking messy. They can be applied first, however, in between rows of things like beans and peas. Just lie them flat. You might need a knife or large scissors to cut them to meet the ends of the row.
  • As with all mulch, keep the area around the plant stem free.

Gathering Seaweed –

  • Be sure to gather with as little negative impact as possible. Only take about 1/3 or less from an area. Then move on to another.
  • Use buckets, small grocery bags and sacks when gathering. It’s wet stuff, so it gets heavy. And slippery. Place a large tub or bin in your car, if you aren’t using a truck bed, to keep from making a mess.
  • Be sure to have permission first. Although most have crews they pay to remove seaweed, it may be against the rules for you to gather it in some locations. Check with the local parks recreation first.
Disclaimer – Seaweed is not for the faint of heart. Things live in seaweed. Like bugs. I’ve found that when gathering, it’s best to pick it up from the very top with a small grip and shake it out. Be ready for critters!

What Makes Seaweed So Great –

  • It regrows rapidly, making it one of the best, most sustainable fertilizers available.
  • It can also be used as chicken feed. Just put it in a burlap sack, place it in the farmyard and for the next few days you can turn it over to find lots of little bugs and critters for the chickens to feast on!
  • Best of all… it’s FREE!

Then there is Kelp Tea

You can make a fabulous fertilizing “tea” from kelp. This works great if you can’t gather large amounts and just want the benefit of the fertilizing qualities of seaweed. Just place it in a large glass container with a lid. You could use a solid bucket, but glass is better. Leave it to sit for just a couple days in the sun. Use the liquid to spray directly on plants or apply to the soil. Again, it’s a great fertilizer and pest repellent.

There is a high salt content in seaweed, of course, so when using as fertilizer or using large quantities you may want to rinse some of the salt off prior to use. Just lay it flat in a driveway and spray it with a hose.

Disclaimer II – Seaweed is not always the prettiest form of mulch. Personally, I like it for some of my gardens but not all. I especially like it in the strawberry patch. Otherwise, I prefer to add it to the compost piles and using it as a tea. For gardens where you will be kneeling often to work, consider another form. It gets very sharp which can make working in the garden a bit uncomfortable. You can see in the photo above how I limit it’s use. I will use something else, like buckwheat hulls, in the rest of the herb garden. I do need to go back for more though.


Have you used seaweed in your garden? Will you now?

Live Well!
~S

Read Full Post »

I am fairly well versed in wild New England Edibles. I love to spend time, basket slung over my arm wandering the woods, fields and riverbanks of New Hampshire foraging for greens and berries and the like.

There is something inspiring, comforting and even exciting about making a meal from things found. Last year, while the Mister and Macala were fishing, I gathered berries. I made a lovely black raspberry crostada. Many Summer nights we enjoyed salads of wild greens found in my travels.

My thirty six years, though, have not been sufficient to leave me anywhere near an expert in such things.  Perhaps under other circumstances. Perhaps were we in a time when survival meant being so. Perhaps, no, certainly, then I would be schooled by a ten year old in the matter of wild edibles.

But I press on! I am determined to learn more.

So what will be next? 

I’m spending some time with my favorite guide this lovely, warm Spring afternoon in the Shire to pick.

My feeling, pick something and learn as much as you can about it before moving on to anything else.

I wonder what it will be this Spring? 

I’ll let you know as soon as I choose.

Live Well!
~S

Read Full Post »

I just wanted to give you a quick update on the milk jug terrariums.

Can you see them in there?!! 

Look at all that cabbage!

So far, I am in love with these things!! They have been sitting on the back deck through hot days and super cold nights. Many of them look just like this. Full of little sprouts waiting to take their place in my gardens.

I haven’t had to water them yet, well, since I properly taped them that is. Be sure you tape them up fully. It kind of defeats the idea of a terrarium when they are more than half open, or worse, the top is flapping in the breeze. I actually had one casualty. The daisies. It too was not taped up. The wind caught it and away it went. It disappeared completely. I’m guessing I will find the jug  in the woods somewhere when I finally have time to venture to that part of the yard for Spring clean up.

Back to the watering, I haven’t had to water yet, but I am thinking it’s about time for some of them. It’s been a very dry Spring so far, so there hasn’t been much in the way of natural watering.

I added some more to the collection.

They are kind of an eye sore but who cares. We are growing here!

As I get more jugs I’m adding what I can. I even ventured into some of the more warm loving stuff. We’ll see how that goes.

Best of all….. the animals haven’t been able to eat a single seedling! Hooray!

Have you started your seedlings? Times wasting!

If you missed it, check out Winter Sown Gardens here.

Live Well!
~S 

Read Full Post »

I am often asked what crazy things I’m up to. It seems to entertain some that I do these, apparently, strange things like make my own sauerkraut and beer. And for others, they have said it makes them tired just hearing about it.

I don’t think I’m the kind that never shuts off. But I do like to be busy. And I do like the feeling of taking an active role in the creation of the things my family uses. I know what’s in them. I know that harmful chemicals and other potential toxins aren’t slipped in. That they are not only better for my family, but the environment as well. I know that they are fresh and wholesome.

It’s a bonus that I am usually saving money as well. And this one is a perfect example.

Laundry detergent can be filled with stuff  like alkyl phenol ethoxylates, ammonia and phosphates. The results can range from skin irritations to immune disruption, poisoning and even cancer.

Did you know that even Seventh Generation is considered toxic and potentially harmful?

Read more about it here.

Making your own laundry soap is super easy. It’s fast and it’s CHEAP!

Here’s what you need –

2c finely grated castile soap – 1 bar (I use Kirk’s for this. It’s the cheapest I have found)
1c baking soda
1c borax
1c soda ash (super washing soda)

*essential oils of your choosing if you would like to make it scented. I prefer lavender or grapefruit.

Grate the soap very fine in a food processor or with a hand grater. Mix everything in a large bowl, adding the scent a little at a time to be sure it gets mixed well.

Makes – 5 cups

Use – 1/8c per load

Cost – 2-6 cents a load!
The higher being with a heavy amount of essential oils and top price for the products.

That’s it!

You can make it a liquid soap by adding water and heat. Use a 5 gallon bucket to mix and store it in.

For liquid soap –

1 bar grated castile soap
1/2c borax
1c washing soda
1/2c baking soda
3 gallons water

Add the soap to 6c water in a pan. Heat until the soap melts. Add the sodas and borax and stir until it dissolves. Remove from heat. In a   large bucket add 4c hot water. Add the soap mixture and stir. Add remainder of water and stir. It will take about 24 hours for the soap to gel.

Use – 1/4 – 1/2c per load

Cost – 2-6 cents per load!

Now let’s compare….

Tide Laundry Detergent costs $17.97 for 96 loads. 19 cents per load.
Contains (ingredients list)  ethanol, phospates, alcohol sulfates, benzene sulfonic acid and other potentially harmful chemicals.

Home-made laundry soap costs approximately $10.04 or less for economy sizes. Roughly 5 cents per load.
Contains sodium bicarbonate (baking soda), sodium carbonate (washing soda), sodium tetraborate (borax), coconut oil and vegetable glycerin.  And takes an extra 10 minutes to prepare.

And to add to the fabulousness (it’s a word. sort of) of home-made laundry soap, it works just as well. Swear!

Oh, and you get to scent it any way you like. I love that part.

Have you made your own laundry soap?

Live Well!
~S 


This post shared at  

Read Full Post »

Making your own yogurt is super easy!

I mean – boil milk, whisk in cultures, cover and wait – easy.

Yes, even you can do it.

Here’s what you need –

1 quart whole milk
1 Tablespoon plain yogurt (yes, just your favorite store bought yogurt)

In a pan heat the milk slowly to just before a boil. You can get technical with this and use a thermometer, but  it really isn’t necessary. You just have to heat it until the top is shiny and tiny bubbles just start to form around the outside. But if you are worried you won’t do it right, or just like to use your fancy little thermometer than heat it to 180-185 degrees. You shouldn’t get a skin, but if you do just take it off.

Now for the hard part. Take it off the heat and wait for it to cool. You have to wait until the milk is warm enough to activate the cultures but not kill them. About 140 degrees. You can put it in another bowl to help the process along. Or even put it in a water bath.

When the milk is cool whisk in the yogurt. Now, don’t get all over zealous with the yogurt. Adding extra will not make it more yogurty (there I go again) or speed the process any. It will have adverse effects. Trust me. One tablespoon per quart of milk. But you don’t have to be super precise either. I told you, this is easy.

Next, spoon it into jars. I like to use a mixture of mason jars in various sizes. Leaving a space at the top to add fruit and such. We’ll talk more about that in a bit.

Now, place the jars in a pan and wrap with a towel.

Put this pan in a warm safe place like the oven. I’m not showing you this part. It’s scary and embarrassing in there. Must. Clean. Oven.

Be sure to NOT turn the oven on. NOT. 

Now you wait. Again. It takes about 12-15 hours for the process to complete. Give or take. Again, it isn’t precise. Just be sure to leave them alone. The more you disturb them the less likely they are to do as they are told.

Once they have set to a solid consistency they are finished. Ready to eat! Or flavor. Keep in mind, this is plain, unaltered yogurt. It will be tart. You can sweeten it with some honey or agave.

You can strain the yogurt in cheese cloth to make it thicker. Essentially, the difference between Greek yogurt and regular yogurt is the straining process. Greek yogurt is strained to make it creamier. Here in the U.S. you are buying “Greek Style” yogurt not actual Greek yogurt – meaning strained and thicker. True Greek yogurt uses sheep’s or goat’s milk. If you like yogurt thicker you can strain the end product through a piece of cheese cloth or even let the milk stay at that just before boiling point a little longer to evaporate the milk some.

You can make your next batch using some of this one and never have to buy yogurt again!

Now let’s talk about flavor!

You can add anything you like. Fruits, nuts and grains.

Here are some of my favorites – 

  • Pomegranate
  • Banana and walnut
  • Apple and cinnamon with honey and pecans
  • Frozen mixed berries
  • Orange
  • Cherries and macadamia nuts
  • Granola and dried cranberries
  • Chocolate chunk granola

Mmmm. I could keep going.

You can also use it for dips and marinades – 

  • Mixed with lots of fresh or dried herbs like chives, parsley, tarragon and garlic for veggie dip
  • Mixed with lime, ginger, cilantro and gram marsala for chicken
  • Mixed with coarse brown mustard, garlic, pepper and parsley for pork

The options are endless, as they usually are when in the kitchen. And yogurt is filled with healthy probiotics that are essential for healthy digestion and optimum immune response. They are killed off when heated, but used as a marinade yogurt helps keep meat moist and adds tremendous flavor.

Now let’s break it down….

I made 64 ounces of yogurt for $1.50

The cheapest I have found Chobani is $1.00 for 6 ounces. That equals $10.00 for 60 ounces!

4 ounces less – $8.50 more

Are you ready to try making your own yogurt?

Live Well!
~S 

This post shared at Your Green Resource

Read Full Post »

This is my first year trying this so let’s take the journey together, shall we?

I have seen this done before. I have read lots of success stories… but for some reason have just never tried. It seems unbelievable, doesn’t it? Here, it is VERY cold nights in February, March. Like near or below zero cold. And people are starting their gardens. Outside! But seeds do what they were meant to do – withstand and survive.

Here we go…

You can start many of your perennials and some vegetables outside. Now. In March. In the snow and cold.

I am starting this very late. I had planned on doing it in early February, but life got in the way. Many start as early as just after the Winter Solstice. I don’t know if the seventy degree weather forecasted for this week will have any ill effect on this outcome, but we shall see. (Obviously I wrote this some time ago. For sake of time and just finally getting this out I’m not bothering to change it.Ok, ok. I confess! I actually wrote this in January and  already changed it once!)

Take a milk jug. Or a few. Or many.


Cut them about 4 inches from the bottom. You can cut all the way around or leave one side as a hinge. I am trying both to see which I prefer.

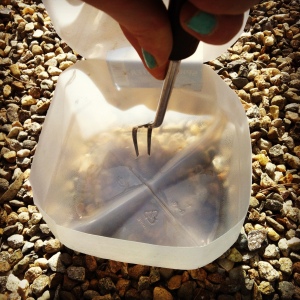
Poke drainage holes in the bottom. I used an old cheap carving fork to start the holes and a chop stick to make them wider.

Start from the inside so the plastic pushes out.

You could use a wood burner to melt smalls holes if you had one. Just be sure you get about 2 in all 4 sections of the bottom of the jug.

Fill with a good starter mixture and water thoroughly

Plant your seeds as directed

I confess (again), I used the cheap 20 cent seeds from Walmart for this experiment. I’m saving the more expensive organic seeds until I know I won’t botch this one.

Be sure to mark your jugs so know which is which

Place the top back on and tape it up. Be sure to leave the cover off

Now place it, them, in the sunniest place available

The jug acts as a mini green house and a bit of a terrarium. You don’t have to water them. The hole in the top allows for natural watering. And the closure helps keep the existing moisture in. It also helps keep everything warm enough to germinate. Keep an eye on them just in case though. You don’t want to let them dry out.

I’m really excited about this. I start seedlings every year inside, but there are always a problem or two. Or many. First, the dogs and cat love to eat them. And find them no matter where I hide them. And let’s face it, there are just so many places to store trays of seedlings. I do plan to start some in the basement this year with a grow light on a timer. But Mr. Kitty has a kitty door and free rein. We never know how it will go.

Second, there are always those days when things get so crazy that checking on and watering the seedlings, well, just doesn’t happen. Terrible. I know. But such is my life. Busy.

Third, if the precious seedlings finally make it to the point of hardening off, there is always that. Will they be forgotten on the deck through the cold early Spring night?

Next is the fact that those grown indoors chance that leggy, weak state that leave them less than healthy and vibrant. Often never making it to anything very productive.

This method is supposed to eliminate all of that. No watering. No grow lights. No hardening off. Just plant, place and wait. When the seedlings start to get too tall for the space or it’s safe to plant, generally after the May Full Moon, you simply open the jugs, separate the seedlings and plant them as you wish. WAHLAH! You have strong, healthy plants for MUCH less than purchasing them at the local nursery. And if you collect your own seeds in the Fall we are talking free! Free.

What plants are best for Winter Sowing?

Vegetables

Beans
Beets
Broccoli
Cabbage
Carrots
Celery
Radishes
Spinach
Kale
Peas
Lettuces
Onions
Potatoes(not seed potatoes)
Peppers
Squash
Tomatoes

Flowers –

Aster
Astilbe
Bee Balm
Broom
Catmint
Cinquefoil
Chinese Lantern
Chrysanthemum
Coneflower
Coreopsis
Clematis
Daisies
Delphinium
Evening Primrose
Flax
Foxglove
Heather
Hollyhock
Hosta
Iris
Joe Pye Weed
Lobelia
Lupine
Phlox
Poppy
Rudbeckia
Russian Sage
Salvia
Sedum
Verbena
Yarrow

There are MANY more than this. Look for words like stratification, self sows, sow early, hardy, wildflower, weed.

I’ll be sure to update with pictures once things start growing.

Have you tried Winter Sowing?

Live Well!
~S

Read Full Post »

You find it decorating your plate at your favorite restaurant. It’s tossed into salads and sauces. But did you know that parsley is so good for you it could help you fight Cancer?

It’s true.

Parsley is more than a fresh, flavorful seasoning. It has been sought after for centuries for its medicinal qualities. Cherished by ancient Romans, mentioned by Pliny, in Greek Mythology and even by Hippocrates. Parsley has been an integral part of both culinary and medicinal culture and revered in both. And you thought it was just a decorative addition to your dinner plate.

Some Parsley Folklore –

  • It was believed in medieval times that it grew in the garden only if the man or woman of the house was honest.
  • When chewed, it would keep away the devil.
  • Worn to ward off intoxication.
  • At Roman weddings wreaths were given to protect against evil spirits.
  • Used as a protection against poisons.

Here are a number of health benefits of Parsley –

  • Cancer fighting properties – contains flavonoids that helps protect cells against harmful oxidation and phytochemicals affect cell division allowing for the correction of DNA mistakes. Considered most effective on treating and preventing Leukemia, Lung cancer, Colon cancer, Pancreas cancer, Ovarian cancer, Prostate cancer and Breast cancer
  • Reduces inflammation
  • Mercury Detox – mix with mint and help rid the body of Mercury
  • Good source of vitamin K for healthy bones, tissue and blood clotting
  • Vitamin A for healthy vision and immune response
  • Vitamin C for healing and healthy skin
  • Provides folic acid, vitamin b complex, for red blood cell production
  • Potassium for healthy blood pressure
  • Iron for preventing anemia
  • A natural diuretic that helps soothe the urinary tract and prevent kidney stones

Used to treat –

  • Kidney and urination problems
  • Water retention
  • Menstruation
  • Menopause
  • Clear toxins in liver and kidneys
  • Calm nervous system

Some interesting uses for Parsley –

  • Medieval revelers placed it on their tables and on themselves to absorb odors
  • Made into wreaths and hung on tombs and used for burial ceremonies
  • Used in protection amulets and placed around the home for protection

Parley is quite easy to grow in both your Kitchen Garden and on a sunny window sill. I have had great success with my parsley seeding itself in my herb garden. You can start yours from seed, inside 6-8 weeks before last frost or directly sown after the danger of the last frost, or purchase fully grown plants. Place them in a sunny location. Water deeply at least once a week and do not allow to dry out completely. Cutting herbs encourages fuller growth so be sure to use your parsley often. Snip the stalks close to the ground, starting with the outside. Parsley grows from the center. In the Fall, allow the plants to go to seed and harvest for next years crop.

What is your favorite recipe including parsley?

Live Well!
~S

Read Full Post »

Older Posts »