Feeds:
Posts
Comments

Posts Tagged ‘live frugal’

Did you know that eating fat doesn’t make you fat? It’s true!

That stuff they call margarine isn’t real food either. It’s gross, it’s harmful and you should stop using it! But you don’t really use that junk, right?

Real food is always better. Always. But even the ones you think are real and wholesome aren’t always as they seem. Take butter for instance. Did you know that butter, yes, the real kind, usually has added preservatives? It’s sad but true. But there’s hope.

Making butter is ridiculously easy! 

Cream, a mason jar and twenty minutes easy.

Fill a mason jar half way with heavy cream.

Put the cover on.

Now shake the day lights out of it!

Shake, shake, shake…

Shake, shake, shake….

The cream will get thick. Keep shaking.

When you think something MUST have gone wrong, keep shaking.

You are almost there….

And then all of sudden, it will happen! The thick cream will separate – buttermilk and butter.

Strain the buttermilk….

But save it for something else like soaking chicken or making biscuits.

Now you have to rinse the rest of the buttermilk out of the butter.

Add some salt if you like and roll into a log and refrigerate.

You have butter!

AND buttermilk!

This butter doesn’t have preservative like that other stuff, as I mentioned, so you want to use this within two weeks.

It isn’t always cheaper to make your own butter but it can be. It depends on the cost of cream and the amount of fat. Some cows produce a fattier milk. If you are lucky enough to know someone with goats (or even better, have your own!) butter can be made with goats cream too. It will be a bit different, but just as good.

I got about 3/4 of a  pound of butter from one quart of milk. Plus about 2 cups of buttermilk. That is a savings over purchasing butter and buttermilk separately. And I don’t get the preservatives.

There is an easier way….

You can use a blender, mixer, hand mixer or food processor and cut the time in half.

There can be mistakes…

The second time I made butter, or attempted to make butter, it was a disaster. We took turns shaking the jar, the mister, babes and I. How fun! We sat and watched TV, chatted and made butter together. But in our fun we somehow missed the separation phase and just kept shaking. We ended up with what looked like chunky whipped cream. Which is just what I turned it into, with a bit of honey (or sweetener of choice) and a bit more whipping.

What happened? We shook the buttermilk back into the butter. Yes, it can happen. I had no idea. I also don’t know if the process can be altered again. I had had enough shaking for the night and never cared for the experiment to be finished.

Now let’s get a wee bit technical…

I’m not saying go ahead and smother everything you eat in butter. I’m not Paula Dean. Although I do love her to pieces. I’m just saying butter isn’t as scary and horrible as we tend to think. And it’s way better for you than something bugs won’t even touch! (Some still claim this isn’t true,but I tried it once and found the margarine free of ants and butter loaded with them. I did not, however, leave it long enough to find out if they moved over once the butter was gone.)

  • A 1994 Harvard Medical Study showed that eating margarine can increase heart disease in women by 53%
  • More recent studies have shown a strong link between consuming trans fat and earlier death
  • Butter does not contain trans fat – margarine does (minus a few newer varieties)
  • Both butter and margarine have the same amount of calories
  • Eating butter increases the absorption of many other nutrients in other foods
  • Butter has many nutritional benefits – margarine does not, unless they are added
  • Butter tastes better!
That old urban legend about margarine being one molecule away from plastic is truly false, however, real food is always best. Something made with “ingredients” like margaric acid, used in making margarine, is not.
If you aren’t into making your own butter at least opt for the real thing. Ditch that tub of tasteless, dyed stuff.

Tomorrow we will talk about flavoring your butter!

Live Well!
~S 

We are moving! Come visit us at …..


This post is shared on 

Read Full Post »

I went to the fabric store the other day.

Big news!

I went only because I wanted to. I didn’t really  have anything pressing to purchase. No project in the making. Well, there is always a project in the making, but the trip was on a whim. Sometimes those really are the best. You aren’t looking for something in particular, therefore you tend to find things you might not otherwise. I found these!

I have this table. It’s bar height. Square. Everything I have tried to find for it doesn’t fit well. Place mats are always rectangular and overlap. I had been wanting to make a square one for the center. The story of my life.

And then I found them. They are actually fabric samples. The ones they hang for you to browse and choose from. These are the heavy upholstery fabric. Perfect. And the edges are already bound.

Oh, and look at that price!

Seriously. Two dollars.

I love great finds!

Live Well!
~S 

Read Full Post »

I am often asked what crazy things I’m up to. It seems to entertain some that I do these, apparently, strange things like make my own sauerkraut and beer. And for others, they have said it makes them tired just hearing about it.

I don’t think I’m the kind that never shuts off. But I do like to be busy. And I do like the feeling of taking an active role in the creation of the things my family uses. I know what’s in them. I know that harmful chemicals and other potential toxins aren’t slipped in. That they are not only better for my family, but the environment as well. I know that they are fresh and wholesome.

It’s a bonus that I am usually saving money as well. And this one is a perfect example.

Laundry detergent can be filled with stuff  like alkyl phenol ethoxylates, ammonia and phosphates. The results can range from skin irritations to immune disruption, poisoning and even cancer.

Did you know that even Seventh Generation is considered toxic and potentially harmful?

Read more about it here.

Making your own laundry soap is super easy. It’s fast and it’s CHEAP!

Here’s what you need –

2c finely grated castile soap – 1 bar (I use Kirk’s for this. It’s the cheapest I have found)
1c baking soda
1c borax
1c soda ash (super washing soda)

*essential oils of your choosing if you would like to make it scented. I prefer lavender or grapefruit.

Grate the soap very fine in a food processor or with a hand grater. Mix everything in a large bowl, adding the scent a little at a time to be sure it gets mixed well.

Makes – 5 cups

Use – 1/8c per load

Cost – 2-6 cents a load!
The higher being with a heavy amount of essential oils and top price for the products.

That’s it!

You can make it a liquid soap by adding water and heat. Use a 5 gallon bucket to mix and store it in.

For liquid soap –

1 bar grated castile soap
1/2c borax
1c washing soda
1/2c baking soda
3 gallons water

Add the soap to 6c water in a pan. Heat until the soap melts. Add the sodas and borax and stir until it dissolves. Remove from heat. In a   large bucket add 4c hot water. Add the soap mixture and stir. Add remainder of water and stir. It will take about 24 hours for the soap to gel.

Use – 1/4 – 1/2c per load

Cost – 2-6 cents per load!

Now let’s compare….

Tide Laundry Detergent costs $17.97 for 96 loads. 19 cents per load.
Contains (ingredients list)  ethanol, phospates, alcohol sulfates, benzene sulfonic acid and other potentially harmful chemicals.

Home-made laundry soap costs approximately $10.04 or less for economy sizes. Roughly 5 cents per load.
Contains sodium bicarbonate (baking soda), sodium carbonate (washing soda), sodium tetraborate (borax), coconut oil and vegetable glycerin.  And takes an extra 10 minutes to prepare.

And to add to the fabulousness (it’s a word. sort of) of home-made laundry soap, it works just as well. Swear!

Oh, and you get to scent it any way you like. I love that part.

Have you made your own laundry soap?

Live Well!
~S 


This post shared at  

Read Full Post »

Making your own yogurt is super easy!

I mean – boil milk, whisk in cultures, cover and wait – easy.

Yes, even you can do it.

Here’s what you need –

1 quart whole milk
1 Tablespoon plain yogurt (yes, just your favorite store bought yogurt)

In a pan heat the milk slowly to just before a boil. You can get technical with this and use a thermometer, but  it really isn’t necessary. You just have to heat it until the top is shiny and tiny bubbles just start to form around the outside. But if you are worried you won’t do it right, or just like to use your fancy little thermometer than heat it to 180-185 degrees. You shouldn’t get a skin, but if you do just take it off.

Now for the hard part. Take it off the heat and wait for it to cool. You have to wait until the milk is warm enough to activate the cultures but not kill them. About 140 degrees. You can put it in another bowl to help the process along. Or even put it in a water bath.

When the milk is cool whisk in the yogurt. Now, don’t get all over zealous with the yogurt. Adding extra will not make it more yogurty (there I go again) or speed the process any. It will have adverse effects. Trust me. One tablespoon per quart of milk. But you don’t have to be super precise either. I told you, this is easy.

Next, spoon it into jars. I like to use a mixture of mason jars in various sizes. Leaving a space at the top to add fruit and such. We’ll talk more about that in a bit.

Now, place the jars in a pan and wrap with a towel.

Put this pan in a warm safe place like the oven. I’m not showing you this part. It’s scary and embarrassing in there. Must. Clean. Oven.

Be sure to NOT turn the oven on. NOT. 

Now you wait. Again. It takes about 12-15 hours for the process to complete. Give or take. Again, it isn’t precise. Just be sure to leave them alone. The more you disturb them the less likely they are to do as they are told.

Once they have set to a solid consistency they are finished. Ready to eat! Or flavor. Keep in mind, this is plain, unaltered yogurt. It will be tart. You can sweeten it with some honey or agave.

You can strain the yogurt in cheese cloth to make it thicker. Essentially, the difference between Greek yogurt and regular yogurt is the straining process. Greek yogurt is strained to make it creamier. Here in the U.S. you are buying “Greek Style” yogurt not actual Greek yogurt – meaning strained and thicker. True Greek yogurt uses sheep’s or goat’s milk. If you like yogurt thicker you can strain the end product through a piece of cheese cloth or even let the milk stay at that just before boiling point a little longer to evaporate the milk some.

You can make your next batch using some of this one and never have to buy yogurt again!

Now let’s talk about flavor!

You can add anything you like. Fruits, nuts and grains.

Here are some of my favorites – 

  • Pomegranate
  • Banana and walnut
  • Apple and cinnamon with honey and pecans
  • Frozen mixed berries
  • Orange
  • Cherries and macadamia nuts
  • Granola and dried cranberries
  • Chocolate chunk granola

Mmmm. I could keep going.

You can also use it for dips and marinades – 

  • Mixed with lots of fresh or dried herbs like chives, parsley, tarragon and garlic for veggie dip
  • Mixed with lime, ginger, cilantro and gram marsala for chicken
  • Mixed with coarse brown mustard, garlic, pepper and parsley for pork

The options are endless, as they usually are when in the kitchen. And yogurt is filled with healthy probiotics that are essential for healthy digestion and optimum immune response. They are killed off when heated, but used as a marinade yogurt helps keep meat moist and adds tremendous flavor.

Now let’s break it down….

I made 64 ounces of yogurt for $1.50

The cheapest I have found Chobani is $1.00 for 6 ounces. That equals $10.00 for 60 ounces!

4 ounces less – $8.50 more

Are you ready to try making your own yogurt?

Live Well!
~S 

This post shared at Your Green Resource

Read Full Post »

This is my first year trying this so let’s take the journey together, shall we?

I have seen this done before. I have read lots of success stories… but for some reason have just never tried. It seems unbelievable, doesn’t it? Here, it is VERY cold nights in February, March. Like near or below zero cold. And people are starting their gardens. Outside! But seeds do what they were meant to do – withstand and survive.

Here we go…

You can start many of your perennials and some vegetables outside. Now. In March. In the snow and cold.

I am starting this very late. I had planned on doing it in early February, but life got in the way. Many start as early as just after the Winter Solstice. I don’t know if the seventy degree weather forecasted for this week will have any ill effect on this outcome, but we shall see. (Obviously I wrote this some time ago. For sake of time and just finally getting this out I’m not bothering to change it.Ok, ok. I confess! I actually wrote this in January and  already changed it once!)

Take a milk jug. Or a few. Or many.


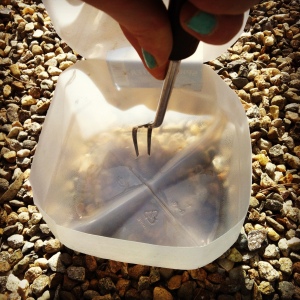
Cut them about 4 inches from the bottom. You can cut all the way around or leave one side as a hinge. I am trying both to see which I prefer.

Poke drainage holes in the bottom. I used an old cheap carving fork to start the holes and a chop stick to make them wider.

Start from the inside so the plastic pushes out.

You could use a wood burner to melt smalls holes if you had one. Just be sure you get about 2 in all 4 sections of the bottom of the jug.

Fill with a good starter mixture and water thoroughly

Plant your seeds as directed

I confess (again), I used the cheap 20 cent seeds from Walmart for this experiment. I’m saving the more expensive organic seeds until I know I won’t botch this one.

Be sure to mark your jugs so know which is which

Place the top back on and tape it up. Be sure to leave the cover off

Now place it, them, in the sunniest place available

The jug acts as a mini green house and a bit of a terrarium. You don’t have to water them. The hole in the top allows for natural watering. And the closure helps keep the existing moisture in. It also helps keep everything warm enough to germinate. Keep an eye on them just in case though. You don’t want to let them dry out.

I’m really excited about this. I start seedlings every year inside, but there are always a problem or two. Or many. First, the dogs and cat love to eat them. And find them no matter where I hide them. And let’s face it, there are just so many places to store trays of seedlings. I do plan to start some in the basement this year with a grow light on a timer. But Mr. Kitty has a kitty door and free rein. We never know how it will go.

Second, there are always those days when things get so crazy that checking on and watering the seedlings, well, just doesn’t happen. Terrible. I know. But such is my life. Busy.

Third, if the precious seedlings finally make it to the point of hardening off, there is always that. Will they be forgotten on the deck through the cold early Spring night?

Next is the fact that those grown indoors chance that leggy, weak state that leave them less than healthy and vibrant. Often never making it to anything very productive.

This method is supposed to eliminate all of that. No watering. No grow lights. No hardening off. Just plant, place and wait. When the seedlings start to get too tall for the space or it’s safe to plant, generally after the May Full Moon, you simply open the jugs, separate the seedlings and plant them as you wish. WAHLAH! You have strong, healthy plants for MUCH less than purchasing them at the local nursery. And if you collect your own seeds in the Fall we are talking free! Free.

What plants are best for Winter Sowing?

Vegetables

Beans
Beets
Broccoli
Cabbage
Carrots
Celery
Radishes
Spinach
Kale
Peas
Lettuces
Onions
Potatoes(not seed potatoes)
Peppers
Squash
Tomatoes

Flowers –

Aster
Astilbe
Bee Balm
Broom
Catmint
Cinquefoil
Chinese Lantern
Chrysanthemum
Coneflower
Coreopsis
Clematis
Daisies
Delphinium
Evening Primrose
Flax
Foxglove
Heather
Hollyhock
Hosta
Iris
Joe Pye Weed
Lobelia
Lupine
Phlox
Poppy
Rudbeckia
Russian Sage
Salvia
Sedum
Verbena
Yarrow

There are MANY more than this. Look for words like stratification, self sows, sow early, hardy, wildflower, weed.

I’ll be sure to update with pictures once things start growing.

Have you tried Winter Sowing?

Live Well!
~S

Read Full Post »

You heard right.

Whole Living With Stephanie is currently searching for Guest Bloggers! AND small companies interested in sharing their wears, plus a little about themselves and their business.

The BRAND NEW site will be up and running soon and so many new things are coming our way.
(…including a new name! sshhh.)

Do you have a blog you want to promote? Are you a budding writer? Do you have a product you love or create that you would like to get in front of hundreds of people a day?

Well, here’s your chance. Just send me an email with some details of your work. I will have a limited amount of space and do ask that all be of the same mindset we share here – green, handmade, natural lifestyles, great writing, wellness, holistic ideas… the options are truly endless. Jewelry makers, crafters, artisans or even just those who welcome the chance to share a favorite recipe, home make-over or thrifting find. You can promote your blog or not be a blogger at all. Have a local book club you would like to promote? How about a design company looking to expand?

You don’t have to be a writer so don’t fear. There will be interview options and articles written for those who prefer.

Let’s share what we do!

Live Well!
~S

Read Full Post »

Yes, I’m on a quinoa kick. I had all this left over from making the Quinoa and Sweet Potato Cakes. So, what to do? Make Tabouleh!

For all you traditionalists out there, I know, I know. Tabouleh is made with Bulgar. And I am a traditionalist with some subjects too. Just not this one.

Quinoa Tabouleh

2 cups cooked quinoa
1 medium tomato, chopped
1/2 small onion, finely diced
1/2 cup parsley, chopped
1 lime juiced and zested
1/2 lemon, juiced
1/8 cup olive oil
1/2 teaspoon sea salt
1/4 teaspoon pepper

* I had a lime that needed using. 1/4 had been cut off for something else so I chose it for this recipe out of necessity. Use what you’ve got!

In a small bowl combine lime and zest, lemon, olive oil, salt and pepper. Whisk and set aside.

Combine all other ingredients. Toss and top with dressing. Allow to sit so flavors meld for some time.

You could really do anything you like with this. Add other veggies and seasonings. Cook the quinoa in vegetable or chicken stock to add flavor. Having something like this in the refrigerator is a great way to help encourage healthy eating. It makes a perfect snack. You know we should be eating 5-6 small meals a day, right? That isn’t always easy. We don’t have time to chop and cook mid morning or afternoon. Make things like this ahead of time and be READY. This offers protein and nutrients in the quinoa, healthy fats in the oil, health benefits in the parsley and veggies. Pair it with lean meat or hard boiled eggs and cucumber slices or other fresh veggies and you have a great lunch or dinner.

Oh, and it’s super frugal!

Let me know what you think!

Live Well!
~S

Read Full Post »

I am in love with sweet potato. And quinoa. Both are some of the most wholesome foods you can nourish your body with.

I really like making “cakes” of all kinds. Brown rice cakes, amaranth and Farro cakes. I started years ago with potato pancakes, but have evolved tremendously. You can mix any vegetables you have on hand with a grain, some seasoning, veggies and eggs and you have a delightful little patty of goodness.

These are incredible!

Quinoa and Sweet Potato Cakes

1/2 cup quinoa, rinsed
1/2 teaspoon sea salt
2 tablespoons olive oil, plus more for frying
1 small onion, diced
2 garlic cloves, minced
1 cup grated sweet potato
1/4 teaspoon coriander
1/4 teaspoon black pepper
1/4 teaspoon rosemary
2 eggs
1/3 cup panko breadcrumbs
1/3 cup grated parmesan cheese
2 tablespoons chopped parsley
1 tablespoon chopped chives

*I like adding cilantro to these also, but if you aren’t a lover of cilantro than skip it for sure.

Bring 1 cup of water to a boil, add quinoa and half the sea salt. Stir, reduce heat to medium low and cover. Allow to cook 15-20 minutes, until the water has absorbed. You can add great flavor by using chicken or vegetable stock instead of water. Allow to cool.

Saute onions and garlic in oil 3-4 minutes. Add sweet potato, salt, pepper, coriander and rosemary. Cook for another 3-4 minutes.

Whisk eggs, bread crumbs and remainder of seasonings in a bowl. Add the quinoa and sweet potato and mix well.

Shape about 1/4c of mixture into cakes. Fry the cakes in olive oil over medium heat until browned. Be sure to not over crowd the pan.

These are great served with a spicy aioli or herbed sour cream. Excellent set on a bed of baby greens. Don’t be afraid to play with the seasoning. Add some curry or cumin. Some fresh basil, a little lemon zest.

They are also a very frugal dinner option. Quinoa has the highest amount of protein of any “grain” (it’s actually a seed). If you are looking for a healthy meat free option, this is it!

Eat your sweet potatoes! And quinoa!

Live Well!
~S

Read Full Post »

So, the other day I teased you with this….

Did you guess that little jar with the cheesecloth top was “ginger bug” for ginger beer?

What is ginger bug?

Ginger bug is the beginning of the fermentation process. It is where all the goodness starts.
To make ginger bug add 2T grated ginger (skin and all) and 2T sugar to 1c water.

Stir and cover with cheesecloth. You want air to be able to circulate, so don’t try to use a regular cover. Remember when we talked about Wild Fermentation and all the good organisms dwelling in our kitchens? They help us stay healthy… and make ginger beer.

Leave your mixture in a warm place. Each day add more ginger and sugar until it starts to bubble. This should take 2-3 days. You can continue to feed it until you are ready to use it.

Now that you have your live ginger bug, you are ready to make some beer!

You need –

  • Water, about a gallon
  • Ginger, 2″ for mild flavor, 6″ for intense flavor
  • Sugar, 1 1/2 cups
  • Lemons, 2, juiced

Bring 2 quarts of water to a boil. Add sugar and ginger. Allow to boil 15 minutes. Cool.

Strain the liquid. Add lemon juice. Strain ginger bug and add to mixture. Add enough water to make a gallon of liquid. mix well and bottle in sealable bottles. Allow to ferment in a warm place for at least 2 weeks.

Light Ginger Beer

 This is a Light Ginger Beer

Chill and enjoy. But BEWARE – this stuff is under pressure. When opening, do so near the sink.

I’ll let you know in a couple of weeks how this batch fared. It was a light version. I used 2 inches of ginger. I have another batch of ginger bug started. The next will be with 4 inches of ginger. And the following 6 inches. Then, it’s taste test time! I think we will make an event of it. Perhaps some Curry, Paneer and Jasmine Rice. I better sharpen my skills.

Who’s up for some Indian food and taste testing at the Homestead?

Have you made Ginger Beer?

Live Well!
~S

Read Full Post »

What’s brewing you ask?

There is always something being created in my kitchen. Kraut, kefir, products, potions and tonics. And today is no different.

Here’s a sneak peek….

Can you guess what I’m making today?

Stay tuned for all the glorious details and fabulous recipes.

Live Well!
~S

Read Full Post »

« Newer Posts - Older Posts »